Thursday, July 28, 2016

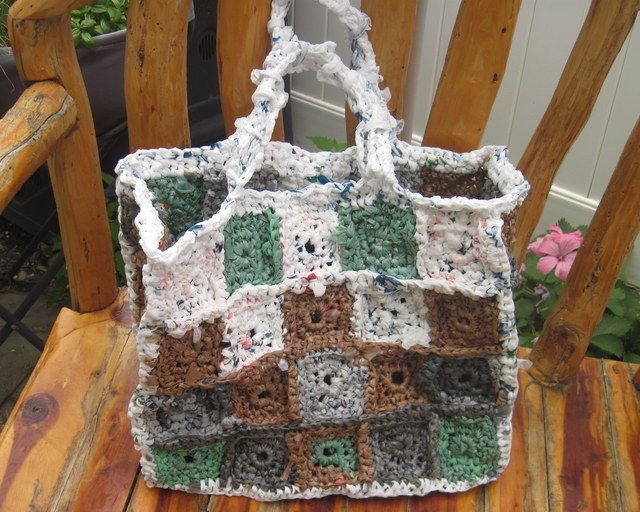
Plarn shopping bag-granny squares

My plastic bag collection was taking over our home recently, so I sat down and spent a few hours turning it into a few large balls of plarn. Then it was time to go "Pinterest Shopping" for inspiration as to what to do with these balls.

I found this picture, and decided to use it as a springboard.


Here's how mine turned out:
 photo IMG_5529.jpg

The pattern I used was pretty basic, just a chain 4, then join into a circle. Next sc 12 in the chain 4 circle, then 20sc, (3 in each corner, 2 on each side) then 28sc. Finish off. 

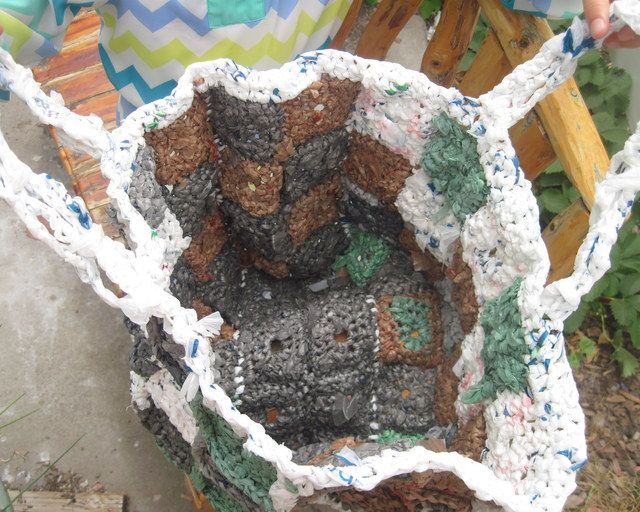
I made a bunch of the squares, then sl stitched them together, and made a border and a handle. 


 photo IMG_5527.jpg

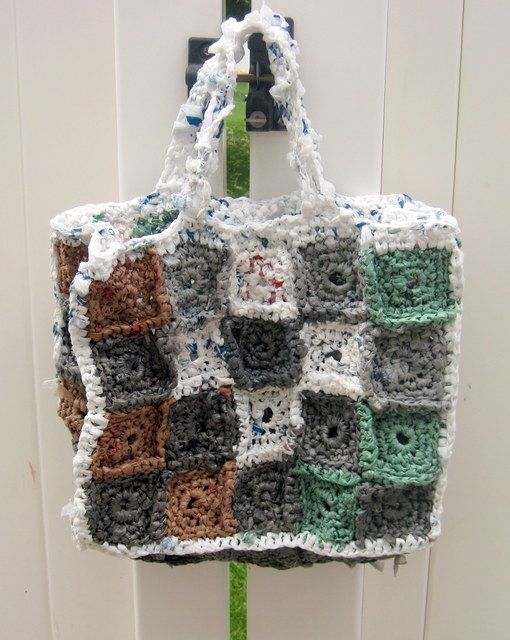
Now I have a nice bag for my farmer's marketing, general shopping, or just taking things around here and there. What's not to like about that?

 photo IMG_5524.jpg


Sunday, May 15, 2016

Cable Crochet Ear Warmers Pattern

 photo IMG_4618.jpg

Since I was in ear warmer mode, I went ahead an made up another one--this one to coordinate with my signature fingerless glove pattern.

 photo IMG_4754.jpg


Cable Crochet Ear Warmers

Size G crochet hook

Ch 34

Rnd 1: sc in 2nd ch from hook and across, *sc in end of row, ch 11, sc in 2nd ch from hook and across, sc in same st as * hdc in next free loops of ch, hdc in last free loop. *Sc in end of row, ch 11, sc in 2nd ch from hook and across, sc in same st as here*, sl st in first sc. Finish off.

Rnd 2: hdc in next sc, dc in next sc, *fptrc in next 2 dc on other side of foundation ch, sk 2 sc behind, dc in next 3 sc, rep from *4 times, fptrc in next 2 dc on other side of foundation ch, sk 2 sc behind, dc, hdc, and sc in next 3 sc, sc in the next 10 free loops of the ch 11 you made in Rnd 1. Sc in end of row, sc in next 10 sc, sc, hdc, dc, in next 3 st. *Fptrc in each of next 2 fptrc, sk 2 st behind, dc in next 3 st, rep from * 4 times, fptrc in next 2 fptrc, sk 2 sc behind, dc, hdc, sc in next 3 st, sc in next 2 sc and the next 11 free loops of the ch 11 you made in rnd 1, sc in end of row, sc in next 10 st, sl st to beg ch 2.

Rnd 3: ch 2, hdc in next st, dc in next st (*), sk next st, fptrc in next st, then fptrc in skipped st, "X" made. Sk 2 st in back of "X" just made, dc in next 3 dc, rep from * 4 times, sk next st, fptrc in next st, then make "X" in last fptrc group, dc, hdc, sc in next 3 st (*) sc in next 9 sc, 2 sc in next st, 1 sc in next st, 2 sc in next sc, sc in next 10 sc, hdc in next st, dc in next st, rep from (*) to (*) 1 time, sc in next 11 sc, 2 sc in next sl, 1 sc in next st, 2 sc in next sc, sc in next 9 sc, sl st to ch 2.

Rnd 4: Ch 2 hdc in next 31 st, sc in next 10 sc 2 sc in next sc sc in each of next 2 sc, 2 sc in next sc, sc in next 10 sc, hdc in next 31 st, sc in next 13 2 sc  in next sc, sc in each of next 2 sc, 2 sc in next sc, sc in next 9 sc, sl st to ch 2.

Rnd 5: Ch 2, sc in the next 106 st ch 4 sc in next st 2 sc, 4 sc in loop just made, sc in next 11 sc, sl st to ch 2, finish off.

 photo IMG_4773.jpg


Pin It

Sunday, April 10, 2016

Ear Warmer Pattern

 photo IMG_4507.jpg


I've dabbled a bit here and there with ear-warmers, but up till now, had never worked up a pattern that really felt right. But, a month or two ago, I started working with a pattern in the round, with varying stitches, and it finally felt good enough to pursue.

 photo IMG_4503.jpg

So, here it is, in all it's "Charlotte-ese" crochet language glory. I call it the . . .

Crossing Lines Ear Warmer Pattern
(!!!! Catchy eh? I'm just full of unique titles over here)

 photo IMG_4505.jpg


Size G Hook

Chain 34

Sc in 3rd ch from hook and to end, 32 st

Round 1-Ch 2, Hdc in same st, make 15 dc "X"s in next 30 loops of chain, hdc in next free loop, *sc in  end of row, ch 13, sc in 3rd ch from hook and next 10 ch sc in same stitch as was done here * Hdc in next sc, make 15 doc "X"s in next 30 sc's. Hdc in next sc, *sc in next st. Ch 13, sc in 3rd ch from hook and next 10 st, sl st in same st as this * End row.

Round 2- Ch 2, Hdc in same st, Hdc in each st across to "tail" (32 st). Sc in next 11 free loops of ch, sc in end and in next 11 sc's, sl st in next sc.

Round 3- ch 2, Hdc in same st, Hdc in each st across to "tail" (33 st). Sc in next 11 free loops of ch, sc in end of row and in next 11 sc, sl st to beginning.

Round 4- Ch 2, Hdc in same st and in next 2 sc's. Make 13 dc "X's" in next 26 st, Hdc in next 15 sc's, 2 Hdc in next sc, 1 Hdc in next, 2 Hdc in next, Hdc in next 15 sc's, make 13 dc "X's" in next 26 sc's, Hdc in next 14 sc's, 2 Hdc in next sc, 1 Hdc in next 2 Hdc in next. Hdc in next 9 sc's, sl st to end.

Round 5- Ch 2 Hdc in same st and next 33 st, *sc in next 11 Hdc, 2 sc in next st, sc in each of next 2 sc, 2 sc in next st,*  sc in next 11 st  Hdc in next 34 sc's rep from * to * sc in next 8 st, sl st to beginning.

Round 6- ch 2, sc's in same st and in next 110 sc's. Ch 4, turn, sc in next 2 sc's, turn back to front side and 4 sc's into loop just made, sc in next 11 st, sl st to beginning, finish off.

FLOWER
Ch 4, join in a circle, ch 4, sl st in circle made, repeat 5 times, six "petal frames" made

Sc, hdc, dc, hdc sc in first "petal frame", repeat in next 5 frames, sl st to first frame

Sl st around post between frames, ch 4. Repeat from beginning 5 times, sl st around first post

Sc in first ch 4 sp, dc 4 times, sc. Repeat in next 4 ch spaces, sl st to beginning, finish off

 photo IMG_4512.jpg

Friday, January 1, 2016

Plarn, the multi-faceted material

I made this bag ages ago, took pictures of it, and never posted it here. So, better late than never, eh?

plarn photo IMG_0811.jpg


I made it out of plastic grocery sacks, which I turned into plarn, following the directions that I posted here. Once I had the plarn, I followed this pattern  for a box-bottom tote at kaylaksthriftyways.com. I found the pattern easy to follow, and pretty enjoyable.

To be honest, the most time consuming part of it all was making the plarn, but it's a really handy bag and I love it. Although I'm sure it would make a great grocery bag, I use it for swimming mostly, I fold it up and put it inside a large canvas bag along with our suits, sunscreen, etc. Then when we're done swimming and have changed into our street clothes, I wrap the wet suits in a towel and toss them in this bag. It means that I leave the pool with two bags (my canvas bag and my plarn bag), but it also means that I don't end up getting everything in my canvas bag all wet from the suits. It's an awesome solution to what can often be a pesky problem.

plarn photo IMG_0810.jpg


Pin It

Tuesday, December 1, 2015

More styles of Christmas Stockings

I've been enjoying trying out some new stocking color combinations lately.

 photo IMG_9607.jpg

This was a custom order I put together awhile ago:
 photo IMG_0348.jpg

And some for the Etsy Shop:
salu1-15st photo IMG_0686_1.jpg

salu1-15st photo IMG_0679_1.jpg

 photo IMG_4131.jpg

 photo IMG_3665.jpg

 photo IMG_3712.jpg

 photo IMG_3715.jpg

 photo IMG_4014.jpg

 photo IMG_3760.jpg

 photo IMG_3765.jpg

Breast Cancer Awareness? Or maybe just for twin baby girls.
salu1-15st photo IMG_0695_1.jpg

And then, just recently I tried a new pattern, this African Flower from Cottage Imaginations. I'm pretty pleased with how they turned out. Hopefully I'll be able to make up a few more like this in different color combinations in the near future.

 photo IMG_3596.jpg


Pin It

Tuesday, November 24, 2015

Infant Newsboy Ensemble - a free pattern

I love making baby clothes. Next to full-size afghans (which take forever, but are so rewarding), baby clothes are my favorite things to make. I love making little girl dresses, and little girl or boy sweaters, but I was getting tired of those, and so I went hunting around the web (mainly via Pinterest, 'natch) to get some inspiration.

And boy, did I get inspired.
newsboy photo IMG_1756.jpg

This set is fairly simple to make, works up quickly, and makes an absolutely darling outfit. I made a few, and as I did so, and using and adapting a few patterns I found here and there, I wrote down my process, mainly so that I could do it again at some point when I'm in the mood. So, as long as I did it for myself, I thought you might appreciate then instructions as well.

Right?

I thought so.

newsboy photo IMG_1730.jpg

Infant Newsboy Set
Adapted with gratitude from the following sites:
-Little Sprinkles of Fun
-Peachy Knits
-Creative Me!
-Repeat Crafter Me 
-Crochet a Flower

newsboy photo IMG_1745.jpg
Newsboy Cap
Hook size G&H

Start with size G hook
Round 1: Ch 5 and join with slip stitch to create circle. Ch 2
Round 2: Dc 10 in the circle.
Round 3: 2 dc in each stitch around (20 dc)
Round 4: Dc in next stitch, 2 dc in next stitch around (30 dc)
Round 5: Dc in next two stitches, 2 dc in next stitch around (40 dc)
Round 6: Dc in next three stitches, 3 dc in next stitch around (50 dc)
Round 7: Dc in each stitch around (50 dc)
Round 8-10 repeat round 7 (50 dc)
Round 11: Ch 1, sc in each stitch around (50 dc)
start brim here
Brim Row 1: turn, ch 1, skip first sc, sc in each of next 4 sc, 2 sc in next stitch, sc in each of next 12 st, 2 sc in next st, sc in each of next 4 sc, dec 1, ch 2, turn (24 sc, 1 dec)
Brim Row 2: Skip first sc, sc across, dec over last two stitches, ch 2, turn (22 sc, 1 dec)
Brim Row 3: Skip first sc, sc in each of next 4 sc, 2 sc in next sc, sc around until there are only 7 stitches left. 2 sc in next st, sc in each of next 4 st, dec. ch 2, turn (21 sc, 1 dec)
Brim Row 4: Skip first sc and sc across, dec over last two st. (19 sc, 1 dec) Do not ch2 or turn.
Brim Row 5: Switch to H hook, continuing from brim, sc down the edge of brim and then sc in each sc around the hat. Sc up the other side of the brim. Sl stitch to close.
To Make Newsboy Band 
Ch 30, dc in 3rd ch from hook and to end. 29 dc. Ch 2 and sc around top, sides, and bottom of band, placing 2 sc in each corner. Fasten off.

Sew band onto hat just above the brim by securing it with two buttons on either side as shown. Then tack brim down using coordinating yarn.

newsboy photo IMG_1750.jpg

Diaper Cover
Hook size H

Ch 47
Row 1: sc in second ch from hook and in each st across. Ch 3, turn
Row 2: dc across, ch 2 turn (47 dc)
Row 3: sc in st across, fasten off. (47 sc)
Row 4: Turn work and count in 11 stitches from the right, attach yarn. Ch 3, dc in next 24 stitches, ch 1, turn. (24 dc)
Row 5: sc across, ch 3, turn. (24 sc)
Row 6-9: repeat rows 4-5 twice
Row 10: dec dc, dc in next 20 st, dec, ch 2, turn (22 dc)
Row 11: dec sc, sc in next 18 st, dec, ch 3, turn (20 sc)
Row 12: dec dc, dc in next 16 st, dec, ch 2, turn (18 dc)
Row 13: dec sc, sc in next 14 st, dec, ch 3, turn (16 sc)
Row 14: dec dc, dc in next 12 st, dec, ch 2, turn (14 dc)
Row 15: sc in each st across, ch 3, turn (14 sc)
Row 16: dc in each st across, ch 2, turn (14 st)
Row 17-20: repeat rows 15-16 twice
Row 21: sc in each st across, ch 3, turn (14 st)
Row 22: dc twice in first st, then one in every stitch across, ch 2, turn (15 st)
Row 23: sc twice in first st, then one in every stitch across, ch 3, turn (16 st)
Row 24: dc in every st across, ch 2, turn (16 st)
Row 25: sc in every st across, ch 3, turn (16 st)
Row 26: dc in every st across, fasten off (16 st)

Join yarn in any dc, make a sc border all around cover, using 2 sc on the turns of each corner. Sew buttons on front as shown.

newsboy photo IMG_1737.jpg


Bow Tie
Hook Size H

Chain 35 loosely, leaving a long beginning tail. Being careful not to twist chain, join to first ch, ch 2, do not turn.
Row 1: Hdc in each chain around. Join, Ch 2
Row 2: Hdc in each st around, join, ch 2
Row 3: Hdc in each st around, join, ch 2
Row 4: Hdc in each st around, join, finish off.

Wind an amount of free yarn around the center, making the "knot" in the tie. Thread through and finish off.

For the strap: Join yarn with sl st in 2nd row, just left of bow "knot". Chain 20 loosely.
Row 1: Hdc in second ch from hook and across, 18 dc. Sl st to back of bow, leave a tail.

Repeat on other side of bow for second side of the strap.

Attach button as shown in picture.

newsboy photo IMG_1747.jpg

Suspender Straps
Hook Size H

MAKE TWO

Chain 48 loosely, working in the bottom "bumps" of chain, dc in third ch from hook, and in each ch to end. Finish off, (46 dc)

newsboy photo IMG_1732.jpg


Pin It

Sunday, November 8, 2015

a rainbow of dishcloths

I've been running low on dishcloths lately, so I figured it was time to make some new ones.

I did some sets using the old classic color combinations . . .

cloth photo IMG_2304.jpg

cloth photo IMG_2302.jpg


 photo IMG_3477.jpg

 photo IMG_3468.jpg

 photo IMG_3238.jpg

 photo IMG_3242.jpg

and I also branched out into some neon hues.
 photo IMG_3225.jpg

 photo IMG_3219.jpg

 photo IMG_3453.jpg

Always fun to play with colors!


Pin It