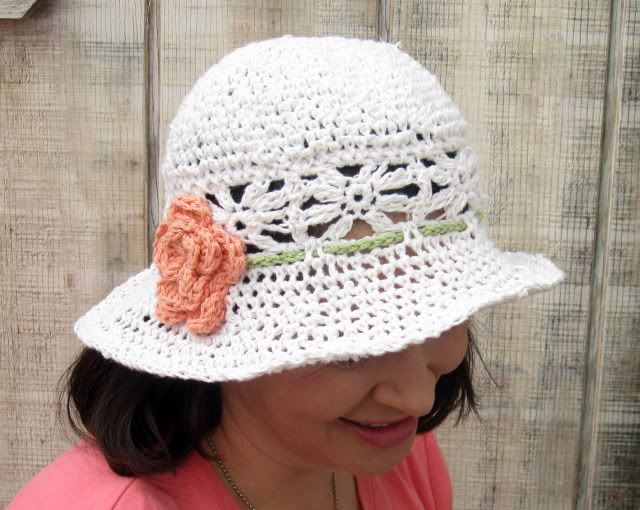
Here's the pattern I've put together for the crochet sunhat that I've been working on lately. Again, my jumping off point was this pattern over at lionbrand.com. I changed some of the numbers as far as hat band motifs, single crochets, and brim rows to make the hat the size and fit that I wanted. Also, I added a wire along the brim.
MATERIALS: 10 oz worsted weight cotton yarn, size G crochet hook, blunt needle
HAT BAND:
Motif (make 9): Ch 4, join with sl st into ring. Work 8 sc into ring, sl st to join. Next rnd: Ch 3, yo and insert hook into same space, yo, pull loop through, yo, pull through 1 loop, yo, pull through 2 loops, yo, pull through rem 2 loops (first petal made). *Ch 3, yo and insert hook into next sc, pull loop through, yo, pull through 1 loop, yo, pull through 2 loops (2 loops rem on hook), yo and insert into same sc, pull loop through, yo, pull through 1 loop, yo, pull through 2 loop, yo pull through rem 3 loops on hook (petal made); rep from * 6 more times -- 8 petals made counting First Petal. Ch 3 and join with sl st top top of first petal. Fasten off.
Assemble Hat Band: Sew motifs together so that there is one ch-3 space free at top and bottom of each motif. Join 9 motifs into long narrow hat band.
HAT:Make magic circle, work 6 sc into ring, sl st to join. Mark beg of rnd, working in a spiral:
Rnd 1: 2 sc in each sc around -- 12 sc.
Rnd 2: *2 sc into next sc, sc into next sc*, rep from * to * around -- 18 sc.
Rnd 3: *2 sc into next sc, sc into next 2 sc*, rep from * to * around -- 24 sc.
Rnd 4: *2 sc into next sc, sc into next 3 sc*, rep from * to * around -- 30 sc.
Rnd 5: *2 sc into next sc, sc into next 4 sc*, rep from * to * around -- 36 sc.
Rnd 6: *2 sc into next sc, sc into next 5 sc*, rep from * to * around -- 42 sc.
Rnd 7: *2 sc into next sc, sc into next 6 sc*, rep from * to * around -- 48 sc.
Rnd 8: *2 sc into next sc, sc into next 7 sc*, rep from * to * around -- 54 sc.
Rnd 9: *2 sc into next sc, sc into next 8 sc*, rep from * to * around -- 60 sc.
Rnd 10: *2 sc into next sc, sc into next 9 sc*, rep from * to * around -- 66 sc.
Rnd 11: *2 sc into next sc, sc into next 10 sc*, rep from * to * around -- 72 sc.
Rnd 12: *2 sc into next sc, sc into next 11 sc*, rep from * to * around--78 sc.
Rnd 13: Work one rnd even in sc, except, increase one sc three times in approximately even places.--81 sc.
Rnd 14-15: Work 2 rnds even in sc.
Join Hat and Hat band: Rnd 1: With right sides tog, sc 81 sts around inserting hook through both hand band and last row of hat to join (each hat band motif will have 9 sc across, 2 sc into ch-3 space, 1 sc into top cluster st, 3 sc into middle free ch-3 space, 1 sc into next top cluster st, 2 sc into ch-3 space). Sl st back seam of hat band and with RS facing, work 81 sc around bottom of hat band (9 sts across each motif as described above). Work 4 rnds even in sc.
Brim Incs:
First Rnd: *Sc into each of next 9 sts, 2 sc into next st*, rep from * to * around -- 89 sts. Work 1 rnd even in sc.
Next Rnd: *Sc into each of next 10 sts, 2 sc into next st*, rep from * to * around -- 97 sts. Work 1 rnd even in sc.
Next Rnd: *Sc into each of next 11 sts, 2 sc into next st*, rep from * to * around -- 105 sts. Work 1 rnd even in sc
, working wire in underneath the sc's.
Embellishments: Make Crochet Ribbon by making a tight chain, as long as you want. Thread through first row of brim, tying in a bow. If you want to add flowers, make them and sew them on to the hat wherever you want, being sure NOT to sew into your ribbon (so that your ribbon can be adjustable).
CHILD/PRE-TEEN SIZE
MATERIALS: 10 oz worsted weight cotton yarn, size F crochet hook, blunt needle
HAT BAND:
Motif (make 8): Ch 4, join with sl st into ring. Work 8 sc into ring, sl st to join. Next rnd: Ch 3, yo and insert hook into same space, yo, pull loop through, yo, pull through 1 loop, yo, pull through 2 loops, yo, pull through rem 2 loops (first petal made). *Ch 3, yo and insert hook into next sc, pull loop through, yo, pull through 1 loop, yo, pull through 2 loops (2 loops rem on hook), yo and insert into same sc, pull loop through, yo, pull through 1 loop, yo, pull through 2 loop, yo pull through rem 3 loops on hook (petal made); rep from * 6 more times -- 8 petals made counting First Petal. Ch 3 and join with sl st top top of first petal. Fasten off.
Assemble Hat Band: Sew motifs together so that there is one ch-3 space free at top and bottom of each motif. Join 9 motifs into long narrow hat band.
HAT:Make magic circle, work 6 sc into ring, sl st to join. Mark beg of rnd, working in a spiral:
Rnd 1: 2 sc in each sc around -- 12 sc.
Rnd 2: *2 sc into next sc, sc into next sc*, rep from * to * around -- 18 sc.
Rnd 3: *2 sc into next sc, sc into next 2 sc*, rep from * to * around -- 24 sc.
Rnd 4: *2 sc into next sc, sc into next 3 sc*, rep from * to * around -- 30 sc.
Rnd 5: *2 sc into next sc, sc into next 4 sc*, rep from * to * around -- 36 sc.
Rnd 6: *2 sc into next sc, sc into next 5 sc*, rep from * to * around -- 42 sc.
Rnd 7: *2 sc into next sc, sc into next 6 sc*, rep from * to * around -- 48 sc.
Rnd 8: *2 sc into next sc, sc into next 7 sc*, rep from * to * around -- 54 sc.
Rnd 9: *2 sc into next sc, sc into next 8 sc*, rep from * to * around -- 60 sc.
Rnd 10: *2 sc into next sc, sc into next 9 sc*, rep from * to * around -- 66 sc.
Rnd 11: *2 sc into next sc, sc into next 10 sc*, rep from * to * around -- 72 sc.
Rnd 12-15: Work 4 rnds even in sc
Join Hat and Hat band: Rnd 1: With right sides tog, sc 72 sts around inserting hook through both hand band and last row of hat to join (each hat band motif will have 9 sc across, 2 sc into ch-3 space, 1 sc into top cluster st, 3 sc into middle free ch-3 space, 1 sc into next top cluster st, 2 sc into ch-3 space). Sl st back seam of hat band and with RS facing, work 72 sc around bottom of hat band (9 sts across each motif as described above). Work 4 rnds even in sc.
Brim Incs:
First Rnd: *Sc into each of next 8 sts, 2 sc into next st*, rep from * to * around -- 80 sts. Work 1 rnd even in sc.
Next rnd: *Sc into each of next 9 sts, 2 sc into next st*, rep from * to * around -- 88 sts. Work 1 rnd even in sc.
Next Rnd: *Sc into each of next 10 sts, 2 sc into next st*, rep from * to * around -- 96 sts. Work 1 rnd even in sc
, working wire in underneath the sc's.
Embellishments: Make Crochet Ribbon by making a tight chain, as long as you want. Thread through first row of brim, tying in a bow. If you want to add flowers, make them and sew them on to the hat wherever you want, being sure NOT to sew into your ribbon (so that your ribbon can be adjustable).